


Hi everyone! In this post, I'm gonna talk about parsing URLs, modules, NPM and much more! Before you follow along, make sure to read my previous posts to understand today's concepts better. 💜
Contents 📜
Parsing Variables from URLs
If you remember, we had already required the url module when we learnt about Routing. Go ahead and console log req.url and url.parse(req.url, true).
For example, here's what you would find if your URL were localhost:8000/product?id=0
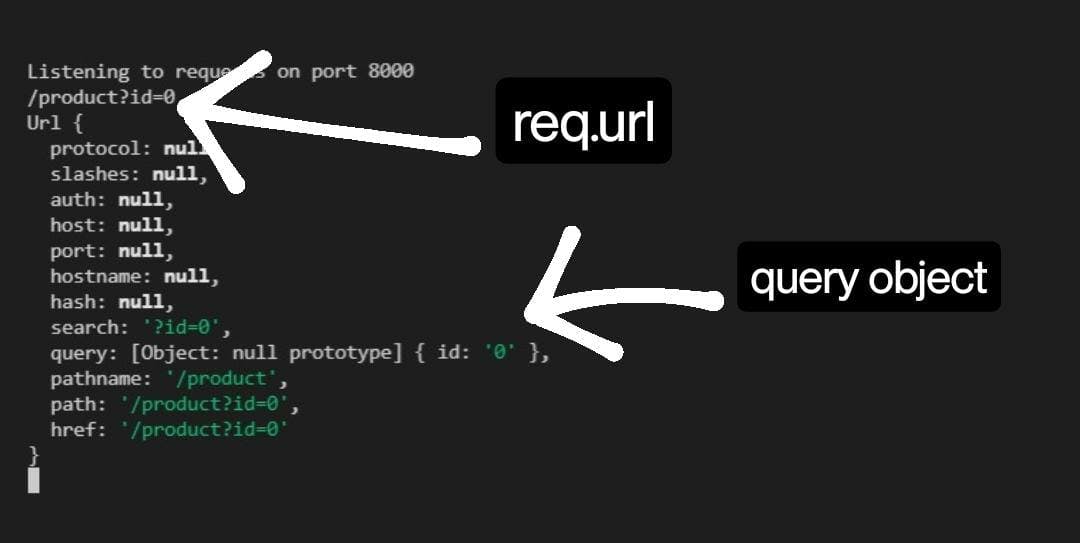
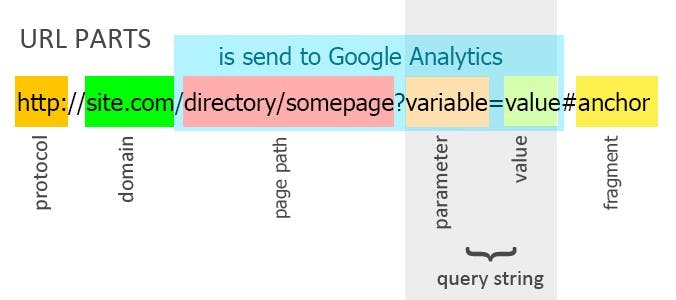
We passed an extra parameter true into url.parse() in order to convert the query into an object. You may wonder what a query is, take a look at the structure of a URL:
const server = http.createServer((req, res) => {
    // obtaining pathname and query object into our variables
    const {query, pathname} = url.parse(req.url, true);

    //Overview
    if(pathname === '/' || pathname === '/overview') {
        res.writeHead(200, {'Content-type': 'text/html'});
        const cardsHtml = dataObj.map(el => replaceTemplate(tempCard, el)).join('');
        const output = tempOverview.replace('{%PRODUCT_CARDS%', cardsHtml);

        res.end(output);

    //Product
    } else if(pathname === '/product') {
        // console.log(query);
        res.writeHead(200, {'Content-type': 'text/html'});
        const product = dataObj[query.id];
        const output = replaceTemplate(tempProduct, product);

        res.end(output);

    //API
    } else if(pathname === '/api') {
        res.writeHead(200, {'Content-type': 'application/json'});
        res.end(data);

    //Not Found
    } else {
        res.writeHead(404, {
            'Content-type': 'text/html', //standard header
            'my-header': 'hello-world'
        });
        res.end('<h1>This page cannot be found.</h1>');
    }
    // res.end('Hello from the server!');
});
This is a code snippet from my previous post, refer to it to know about the other variables and functions used.
In the above code, you can notice that query and pathname have been extracted from the returned object of url.parse() using JavaScript ES6 Destructuring. And now, we can simply replace pathName with pathname in order to parse the variable straight from the URL.
So, for example you'd like to display products(see the route to /product in the above code) according to their IDs (available in your JSON file), you would retrieve each product using dataObj[query.id] (dataObj is the object returned by JSON.parse()). This is the simplest way of retrieving an element based on a query string.
Using our Own Modules
Let's see how we can create our own modules(a set of functions that you want to include in your application) so that you can export a function from that module and also import it into another module! 🚀
In Node.js, every single file is treated as a module
We sometimes use a function in several files and this demands it to be written everywhere.
Modules are created when the functions in them are used in several files. I am going to convert our replaceTemplate() into a module. For that, lets create a folder called modules and a file inside it called replaceTemplate.js. Cut and paste the function into this file. There are several ways of exporting a function from a module (which will be discussed in further posts). The simplest of them all is module.exports. Each of our modules has access to an object called module. We can set its exports property to our anonymous function.
module.exports = (temp, product) {
    // function body
}
To import this into any file, we would require it like this:
const myFun = require('./modules/replaceTemplate');
Intro To NPM
NPM(Node Package Manager) is a command-line interface app which gets automatically installed when we install Node.js. We can install and manage packages from the package repository, npm.js. Fun fact: It's the largest software repository in the world, no matter what language we're talking about! 🤯
The first thing we do when we create a new Node.js project is npm init. This will create a package.json file which is basically a configuration file that has data about our project.
Types of Packages and Installs 📦
The two types of packages that we can install in Node.js are simple dependencies and development dependencies.
Simple or regular dependencies just contain some code that we include in our code, hence the word dependency
To install a simple dependency, like Slugify, simply use the command
npm install slugifyDevelopment dependencies are tools for development. For example, code bundlers, debugger tool, testing libraries etc.,
To install a dev dependency, like nodemon, use
npm install nodemon --save-dev. This tool is essential for all Node.js developers because it automatically restarts the server every time a change is made. No more Ctrl+C and restarting, yay! 🥳
The type of installing we have done above is local installation, meaning the dependencies are only installed in that particular folder, you cannot use them anywhere else. We use nodemon in all our Node.js projects and of course would like to install it in such a way that it is available everywhere on our PC. To install a dependency globally, simply use a global flag like so: npm i nodemon --global (i is short form for install)
Note: If you're on Mac, global installation might give you trouble, you can try this: sudo npm i nodemon --global and enter your user account password.
Now that we have nodemon, here's how you can run your files using it: nodemon index.js. In case this gives you an error, try this.
Remember: We cannot run any dev dependencies which were installed locally in our project on command line, to run them, we need to specify an npm script.
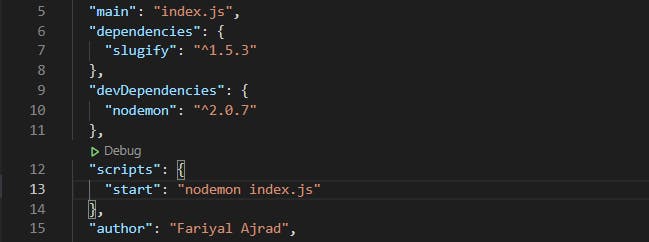
This how your package.json would look like after installing simple and dev dependencies:
Using Third Party Modules
To require a third part module like the one we recently installed, all we need to do is const slugify = require('slugify');. Node.js will automatically look through the node_modules folder where all our dependencies are present and search for our module there.
Click me to know about slugify.
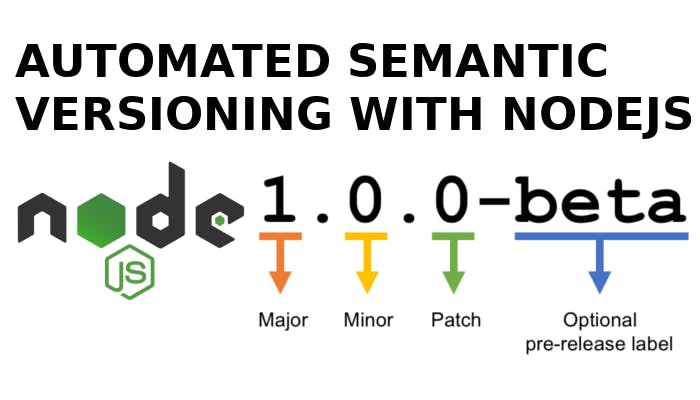
Package Versioning and Updating
Each package has a version written in semantic version notation.
When a new major version of any of our dependencies is released, our project might start misbehaving.
- To check if our project contains any outdated packages, use
npm outdatedand that will display us all the outdated packages in a table.

To install a dependency of a certain version number, like slugify of version 1.0.0, use
npm i slugify@1.1.0To only install only the minor releases of a dependency, change the
^to~in our version number in package.json like this"slugify": "~1.0.0"To update to our wanted version, use
npm update slugify
Did you notice the package-lock.json file? This file consists information about the all the dependencies and also the dependencies which our dependencies might be using. It is very important for our teammates to have the same version of all dependencies as us. So make sure to share this and package.json file with your teammate(s).
Finally, I'd like to point out to never share or check out your node_modules folder. It is HUGE and it can easily be installed whenever and wherever we need it. You might wonder how we would actually get the needed dependencies to our project then? Well its simple, run npm install and Node.js will read your package.json file and install all the needed dependencies for you!
You've reached the end of this post! 👾 Thank you so much for going through it, even if you just combed through. I hope my learnings helped you gain an insight or revise your concepts on Node.js. I will be ending this Node.js for Newbies series here. I really really enjoyed documenting all of it, hope you did too. I've decided to continue my blog posts and create more series! 💃🏻 Stay tuned! Feel free to leave your feedback or questions in the comment section 👇🏻